---
Entry #1 - "First Message"
Well, I've set up blogs for people before and even set up a few of my own for testing. But I've never had much interest in actually using one until now.
Originally I had set up a webpage with some info on my own learning/experiments in extending the range of wireless networking, but as I added and deleted info it got disjointed and disorganized, and I didn't know what to do with it.
So I decided to try this blog format. Thanks to Blogger.com for providing free blogs for lots of people.
A quick note about me... I have been working with electronics, radios, and specially computers since I was a kid and my work is computers and the Internet.
----
Entry #2 -"A little info...and different things"
I originally wanted to do some long-distance experimenting with wireless networking.
Firstly though, I want to say that this blog and info is for people who want to LEGALLY experiment with long-distance wifi. If you're trying to use your neighbor's connection without his permission then please go elsewhere. Remember, if you don't have permission to use it and it's not a free access point then it's illegal to connect to it.
Wireless networking has definitely held high interest for me. It combines some of my hobbies and work (computers, networking, radios, and electronics) into one thing.
So I picked up a couple routers and wireless cards. Unfortunately they were all ones that did not have detachable antennas (older Belkin and Netgear) . I figured I'd put antenna connectors on them, but after looking at the tiny traces I'd have to connect to I put my experimenting on the back burner for a time and just played with the wireless aspect 'as-is'.
I did set up a local Wireless Networking in NNY Yahoogroups Mailing List, and while a few people joined and posted it quickly died.
I want to also throw in a quick thank you to an old friend of mine, Peter B. - he's given me some older obsolete equipment to mess with over time and we've traded software, links, and advice for years.
A quick and easy project you can try, that really works - is to make reflectors for the stock antenna on your router or PCI card. It does work, maybe 10 - 17% increase in power or so. Here's the original link and a modified one here.
One of the projects I was working on - adding an antenna to my existing Belkin PCMCIA card. Blah. Anyway, some info from my old webpage:
Abandoned project - Belkin Wireless PCMCIA Notebook Card Model F5D6020 ver.2
This card is much different then the version 1 of this model. Version 2 is the same as the SMC-2632 card and has a Atmel AT76C502A Chipset.
To add an external antenna I researched the links you can find below as well as many, many others, and Usenet groups too. I found nothing on modding my card, but some on other cards. After giving up on finding anything I set out to figure it out myself. First I checked the FCC database and found some info after entering the FCC ID of the card. Some internal photos from Belkin showed some nice shots of the 'innards' of this bird. But nothing on taking it apart.
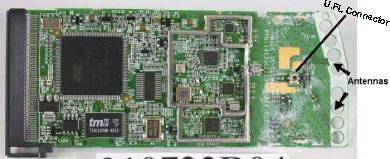
I could find the two small antennas and a U.FL plug (used for testing?) in the photos. After a little fiddling with the actual card I saw that I might destroy the card before I got it apart.
Back to the pictures I got from the FCC site first... On closer examination on one of the photos I could see the Belkin label on the plastic part seems to be covering an access hole, and it looks like it is right over the U.FL connector and is on the correct side. Carefully peeling it up reveals this to be true (see pic below).
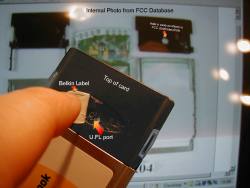
Now all I needed to do was find a U.FL connector for it, and wire some some pigtails into a BNC connector. Once I have that I will be all set to test external antennas. Supposedly on other cards when you plug something into the U.FL port it disconnects the internal antennas, but also the U.FL port might not be a heavy-use connector. So possibly it will be best to permanently mount this connector onto the card and always use an external antenna - plugging it into the N connector on the end of the pigtail instead. These little U.FL connectors seem to be very expensive for their size!
I ordered a U.FL to N pigtail from netgate.com (item #PIG-UFL-NF-19) . It cost about $23, after shipping. Received it fine and plugs in under the label on the card, just like it is supposed to. Now I just need to mate an antenna to it. NOTE - this project is abandoned...
---
Entry #3 - "A reason for a little experimentation"
Out here in the country the dial-up service for the Internet isn't that good (we use Verizon for the phone line and Westelcom.com for the ISP. Recently we had so much trouble with the telephone that we couldn't get online and could barely talk in the evening, because of the static. We called Verizon and a tech guy came out the next guy. The guy was a real knowledgeable, helpful dude who re-wired each box from here to Watertown after I told him we had this problem each year. We got great speeds after that, but still slow by most people's standards).
There's no DSL and so far no sign of it. Satellite is too expensive, and so is using a cell-phone for it. Roadrunner doesn't travel all the way down my road but I'm close to a main road where it does go.
Time Warner refuses to make the cable run to us, no matter how much we bug, cajole, or argue with them they won't do it unless we pay mega-bucks to have it done ourselves.
Doing a good portion of my work online it gets tedious and sometimes downright impossible to use dial-up.
Running my own cable that distance is pretty impractical. I'd need an amplifier for the signal if I used smaller coax, and it would be pretty expensive if I used a less-lossy but larger coax.
A quick look around shows that my kitchen window has a direct LOS (Line Of Site) with the window of another house on the main road where existing cable for TV already is installed. The neighbor is even willing to let me pay for RR set up at his place, as well as set up equipment to send the signal wirelessly to me.
So I needed a wireless bridge between a broadband connection and our home/office network.
---
Entry #4 - "The Mighty WRT54G"
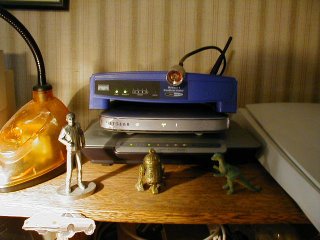
After doing some research and picking up a few more routers, I finally settled on the hobbyists' choice of a Linksys WRT54G which could be made into a wireless bridge - this saves me from buying a dedicated bridge router and it's cheaper, has more features, plus I can use it for other things if the project doesn't work out or we actually get some sort of broadband connection directly to our house.
Great router, but even better with the DD-WRT firmware replacement. I tried a few other firmware replacements (like Freeman Basic) and finally settled on the DD-WRT. You can find a list of others at Linksysinfo.org.
Basically - it's a great router out of the box but a bunch of people found out that they could create their own LINUX-based firmware (the firmware is the operating system for the router). This firmware added many more features to the router, like the ability to increase it's power output, make it into a repeater and bridge, as well as many other features.
The process of replacing the existing firmware is easy, though it does come with it's own risks. Screwing up can 'brick' the router - render it dead, unusable. There are some methods for restoring it; some of them easy and some more involved, like shorting pins on a component inside, or using a JTAG cable and some software.
There is tab on the original firmware web-based interface to update the firmware. Linksys expected you to update with their own firmware of course, but it works for this after-market software just was well.
All you need to do is go to the DD-WRT site, download the correct firmware for your version of the router (it comes in a number of different versions), and upload it via the web interface to the router. Restart it and you're all set.
Unfortunately I ran into some troubles learning how to make it into a bridge and making it work with an older 802.11b Linksys router. I had a lot of work to do, plus we were having a large addition put on our house as well as all the projects that went with it. It took me quite some time to get back to working on the project. One of the most helpful messages was the one in this thread.
---
Entry #5 - "The Bridge - It works, now to tweak it"

I finally got it to work, thanks to lots of articles on the process and lots of experimenting. There was a thread on linksysinfo.org that was a great help but the link is no longer valid and I can't find the particular nor who wrote it. A good link from the DD-WRT WIKI on bridging, this one also explains it, though it pertains to different firmware.
You should be able to use pretty much anything as your main router, unlike where you use WDS - you don't need the same piece of hardware at each end. Just make note up your network settings on the main router, as well as it's SSID and channel.
Basically:
*Upload the firmware to the router you want to use as a bridge, reset the router, and make sure your computer is connected directly to the router. You probably should turn off any security on your main router until you have this all working correctly. It's best if you use Internet Explorer to do the following, and make sure your computer is plugged directly into the router you want to use as a bridge. Log into the router using the web-based interface.
*On the first tab, Setup; turn off STP and disable Internet connection Type. Scroll down and go to the Router IP and set this to something outside the range of the DHCP on your main router. If you main router is 192.168.5.1 and the DHCP range is 192.168.5.2 to 192.168.5.100 then set your bridge to something above 192.168.5.100. I also disabled DHCP on the bridge router.
*Go to the Wireless tab and make sure the router is on AP, and set it to the same SSID and channel as the main router.
*Go to the Security tab and turn off the firewall.
*Go to the Administration tab and turn on Telnet.
*Now reboot the router, you can do this on the admin screen.
*Go to your network settings on your computer and temporarily set the IP of your computer to something outside of the main router's DHCP but not the same as the one you assigned the router. Open a Telnet client, there should be on already on your computer.
*Type these lines, pausing a little after each one:
wl ap 0
wl wet 1
wl join SSID
nvram set rc_startup="wl ap 0;wl wet 1;wl join SSID
nvram commit
The first line turns off the AP mode that you set. This turns real bridge mode on, you've just saved yourself a lot of money and have an equivalent to a Linksys WET54. The third line joins you to the main router's SSID (make sure you put in the correct SSID here). The fourth and fifth lines save this info to the bridge router's memory (again, make sure you have the correct SSID in place). Once you get everything working you can add the WPA network key after each instance of SSID (I haven't tried this). The router should have connected to your main one at the third line so you should be all set.
*Now you can set your computer's IP back to assigned or whatever you had it set at before and you should be all set.
Follow these instructions, though I see on the recent version of DD-WRT (V23) you can click on the STATUS tab, then WIRELESS sub-tab, click the SURVEY button near the bottom, and it should pick up the main router (after following the above directions). Just click JOIN over on the right.
On my project the Linksys 802.11b router was the weak link. Over the distance I needed, the signal dropped enough for it to ramp down to a lower speed - I needed as much signal strength as possible to cut through potential hard rains, heavy snows, and other weather conditions that might decrease the signal further.
I could increase the power of the existing WRT54G in the settings for it, but I didn't want to increase it too much. Both because going too far might burn it out or decrease it's life, and the fact that increasing the power is only one-way; the router at the other end might receive better with a higher signal from this end but it's stillnot going to make my end receive any better...
Lots of great features in this firmware. You can even throttle some ports and applications so that they get more bandwidth priority over other things, under the QoS rules. Very nice. Also, an IP can be entered to prioritize certain computers, haven't tried this yet but sounds useful.
So I decided to get working on some antennas as well as picking up another WRT54G.
The first WRT54G was a version 3, maybe the best version they came out with?
Unfortunately I was still learning the in's and out's of the piece of equipment and waited too long to buy another - I got a version 5. Linksys, for whatever reason (which is debated) decided to give the version 5 a different OS (VXware) and less memory. Both of which severely limited customizing it. The DD-WRT software couldn't be uploaded and run on it, nor any other third-party firmware. And by the time I got done screwing around with trying and waiting for another version of formware to come out - it was too late to return it.
At some point someone did figure out how to do it, but with the help of a cable called a JTAG, which plugged into the router internally and used a modified version of the DD-WRT software. While it was certainly within my scope of abilities I felt that was a bit more time and resources then I wanted to put into it for the time-being.
But the V5 worked pretty well in it's stock form, anyway.
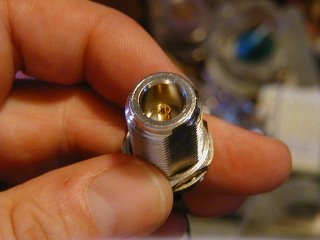
I set about making antennas. Which turned out to be a problem - not the making of them but getting that connectors. The N-connectors I needed to make the antennas couldn't be found around here and buying something for $5 online meant paying at least that much or more in shipping. Finally I found a couple good deals on eBay as well as on two pigtails. The pigtails had to be special ones, with the N-connector - needed to plug into the antennas - on one end, and a reverse TNC on the other. Why would Linksys put a reverse TNC on their routers instead of a standard one ? I don't know. Finally, I found a set for a fair price so now I had all the pieces - two N-connectors and two pigtails with matching N-connectors and reverse TNC on the other end. All I had to do was experiment with making the antennas.
Wow, a group of experimenters managed an un-amplified WI-FI connection of 125 miles! Click here and here.
---
Entry #6 - "Antennas and Other General Methods For Better Signal"
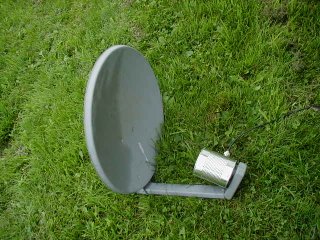
 I had fun; I used coffee cans, bean cans, canned vegetable cans, and a satellite dish. Some baked bean cans seemed to work the best. Bush's I believe (the one on the right). A friend recently brought me a large dish for experimenting. Unfortunately, after checking it, it has no metallic surface so I will need to use a mesh on it. But it should be interesting.
Using the baked bean cans I can get an okay signal for the distance I need (while aiming the can antennas I even picked up someone else's wireless). But I need to play around with where to mount the N-connector in the cans as well as work on aiming. Good link with calculator for making your own tin can antennas.
I set up a test computer at the other end with a webcam running, and get a consistent good signal. It took me awhile to figure things out and even longer to get the time to play around with the whole thing, but finally a good beginning success.
Here's the distance I need to cover, with a tin can antenna set up on a tripod. You can see the house in the distance if you look closely.

There's a number of other things you can do for a better signal, in general.
If you are using your router for trying to cover a particular area or location then you can try various temporary things like putting cookie sheets or something else with a reflective property behind the router (on the opposite side form where you want the signal to go) to reflect the signal. And/or by building these simple antenna reflectors - http://www.freeantennas.com/, the last three listed there. You just slide these over your existing router's antennas and sometimes can get about 10+% more signal in the direction the reflector is pointing, or even more. I have had really good results with these. If you're not good at "crafty" projects they might come out looking not-so-great, but they usually help either way.
In addition to making your own antennas like mine at the beginning of this entry, or the antenna reflectors from the above paragraph; you can go for a high performance 2.4GHz commercial antenna. But, of course, these can cost hundreds of dollars. And you can get the same or better performance by just making your own, for a fraction of the cost.
You can also just get online and buy a Cantenna, already made and with pigtails matching your router and sporting a snappy paint job. These are basically the Pringles can antennas that people make, prettied up and all ready to go. http://www.cantenna.com/
One thing to remember is that even though there are usually two antennas on your router, it is sampling them and picking the one with a best signal, or at least what it thinks is the best signal. So you can't replace one antenna with a directional antenna and leave the other omni-directional in place and expect to get the benefits of both - it's one or the other that the router will use. The DD-WRT firmware and some others let you select which antenna you want to use.
So anyway, the above methods you would only use if you needed an increase in strictly directional signals.
For omni-directional increase in coverage you can replace the stock antennas with somewhat better ones with higher gain. You can get these for $40 or $50, or even less on eBay. A few examples are near the bottom of this Linksys page. Just make sure that if you go this route you get one with the proper connector for your particular router. You can also finds plans on the Internet for making your own omni-directional antennas, but they're certainly less popular then directional ones. Here's plans for one.
With the DD-WRT firmware you can boost the power of the WRT54G router series, just don't go crazy with it and pump it to the max. Your router may overheat and be ruined, or you may decrease the overall life of it. Other routers may have this feature.
You can also get 'booster amps', but while these will amplify your signal they are also going to amplify any interference and noise too. Not to mention they'll cost more then you paid for your router, probably.
---
Entry #7 - "The WRT54G V5 firmware update"
Well, someone has finally done it and figured out how to update the WRT54G V5 without using the JTAG cable. Link here.
I haven't tried it as yet, let them work out the bugs a little first.
---
Entry #8 - "Adding another router to cover more of the home/office - Alternate Configuration is very useful"
Another computer tech seemed to be surprised that I was daisy-chaining routers together, not sure why. No cross-over cat5 is needed or anything, just plug 'em into each other. Daisy chained combos of wired and wireless together fine, had five in a row at one time when I was setting them up.
I have everything set up with static IP's and when I want to add a router I just give it another IP in the same network range, turn off DHCP. With a new addition to the house my old wireless router wasn't going through the walls well enough so I added one right below the floor in the new section of the house, water-proofed it in a sealed plastic bag (the router didn't seem to generate enough heat down there for the bag to stop the heat dissipation, the cellar is real cool all times of the year - but something I'm still checking just to make sure).
Now the rest of the house is covered as well as the back deck and yard. I have it on a switch so that it is only energized when I need it to be.
Alternate Configuration is very useful
This is useful if you regularly connect to different networks where one has static IP addresses assigned to each computer and others don't. Set it up under this tab and let Windows do the work for you, so you don't have to go in and switch it every time.
You can find Alternate Configuration by going to your Network connections and right-clicking on your wireless card, then selecting Properties. On the first tab (General) you'll see Internet Protocol TCP/IP listed, select this and then click Properties. On the next screen make sure Obtain an IP address automatically is selected and you should see the Alternate Configuration tab, click that and then User Configured and enter your static IP and other info here.
This works with Wireless Zero Configuration turned on so make sure that's all set up (with the various networks you are using set to automatically connect).
Once everything is set it should automatically discover and switch between static and automatic IP configuration depending on when it's needed.
---
Entry #9 - "A few interesting links"
Network research tools from Microsoft. Interesting.
---
Entry #10 - "WRT54G V5 DD-WRT Micro Firmware Burn Success"
Well, with fingers firmly crossed and after a look at the length of my warranty from Linksys - I just went ahead and followed the instructions for burning the DD-WRT Micro firmware.
One small SNAFU - after the VX_Killer upload I couldn't connect to the router...
I had to manually set the IP address of the computer to a fixed address, as it would not pick up a dynamic address from the router at this point, no matter what I did.
But once I did that I could use the TFTP program to upload the DD-WRT Micro firmware and everything worked fine after that.
The micro version seems to be feature-packed and has everything and more that I need.
3 comments:
---
Entry #11 - "Finally Found a 12 Inch Chinese Vegetable Strainer"
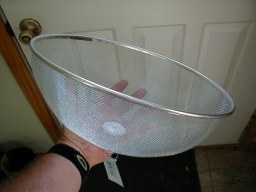
Finally found a 12 inch Chinese vegetable strainer for my next experimenting. Why do all the stores only sell 8 inch or below? Found a cheapo one at a dollar store in Syracuse.
Now where the hell is that Netgear USB device, still stuck in transit I guess...? It should be mountable right at the 'focus' of the strainer.

---
Entry #12 - "Some Testing with USB device, Satellite Dish, and Strainer"
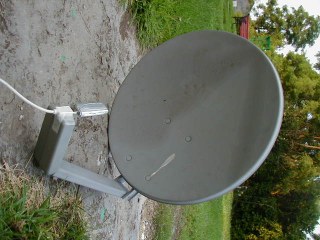
I finally received the MA111V2 (re-manufactured, and free shipping!) USB Netgear adapter from a company called JustDeals.com. So I grabbed a USB extension cable I had and packed the laptop up to take outside for some test.
The directivity on the strainer is neglible so far. I believe that it isn't a perfect parabola, for one thing, as the sides angle up too quickly to about 90 degrees. Still doing tests with it as I have to devise some way to mount the adapter in the middle of it, without using a Rube Goldbergian popsickle stick assortment and scotch tape...
Better results with the old Dish Network satellite dish. I cut the horn (LNB, the little roundish thing that sticks out intho the middle of the dish) off it and mounted the wireless adapter right there with some tape. A little screwing around with angles and such and I had a quick, down-and-dirty, probably-not-quite-at-the-focal-point mount for it.
Some good results and while testing it with my own wireless routers and Netstumbler I picked up some neighbor's wireless networks. And I'm not exactly close to any neighbors.
A quick check with the Windows' wireless software showed an okay passive signal strength for both receiving my own network and others nearby.
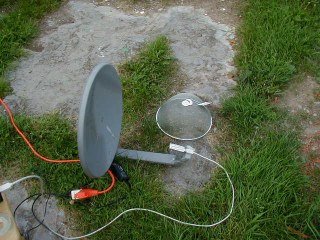
But on further testing with rotating the dish I get some strange results. Still testing. At right is the strainer, and the dish setup.
I have noticed that even without a reflector and with the USB extension cable plugged in the device picks up my home network better then any PCMCIA card. Definitely nice for getting more range for your own network, or for wardriving as you'd just hang the device from your rearview mirror for better reception, even without any other mods.
For those who are into wardriving you can download a version of LINUX made just for doing wireless surveys or wardriving or what-have-you - link.

---
Entry #13 - "Wow, Geekalicious"
Check it out, you won't be sorry - http://www.smithstuff.net/steercan/Steercan.htm


hey, can you tell me if you were able to set up wireless bridge w/ the v5 like you did below on earlier units, using the telnet commands 'wl ap 0' etc... I put on micro f/w, but was not able to get bridge in this way, like w/ prior uints.
hey, did you get the v5 to do wireless bridge using telnet commands below? I was not able to w/ the v5, but can w/ prior unit.
Response to anonymous...
I am using the WRT54G V3 that I have as the bridge unit itself, so while I did use the TELNET commands it was on the bridge - which was the V3 and not the V5. The V5, burned with the firmmware, worked fine as the main router for the bridge.